# Spring Boot JWT demo
This is the first article in a series to illustrate the use of JWT tokens with Spring Boot REST API.
# Goals
In this project we will demonstrate:
- JWT authorization with Spring Boot REST API
- Externalized mySQL deployment via docker
- local deployment of Spring Boot app (for development and demo purposes)
- a brief instroduction of Vuepress as a document building platform
Inspired by the excellent Spring Boot tutorial by Bezkoder
Original Github repository available here
# Getting Started
In this project, the application can be run in two ways:
- as a regular Spring Boot Application from your IDE
- as a standalone Docker container, with its own image
Either way will depend on the database services already available when the app starts.
We're using version 3 of docker-compose, which makes it harder to define a startup order (by using healthchecks, for instance).
So we'll keep this simple by running the database services in a separate process:
> docker-compose up adminer db
The coomand will start two services: mysql and adminer.
You can check if everything is ok, by accessing Adminer, which is lean administration tool for mysql.
If you have other services running on your machine, you might need to tweak port mappings to avoid any clashes.
# Running from the IDE
If you haven't done it already, load the project into your IDE, then run JwtTemplateApplication, and wait for the proper logging messages to show up on your console.
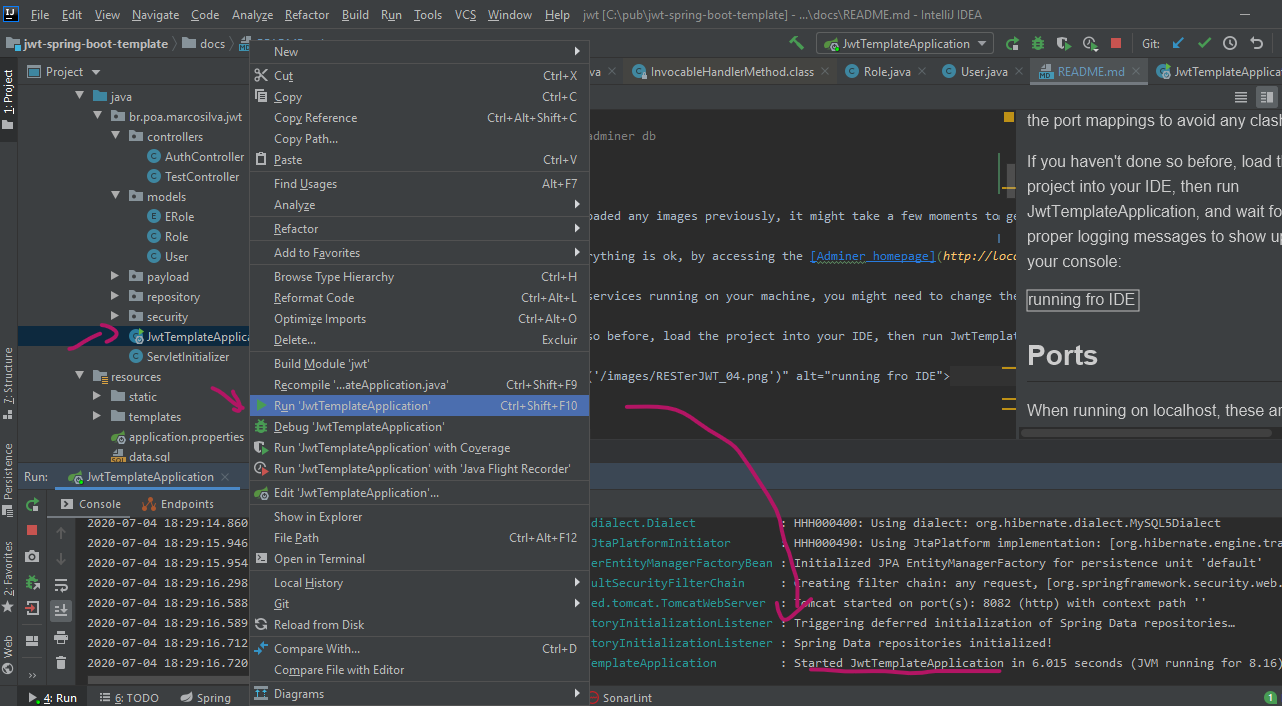
By using the IDE, you may debug the application instead of simply running it. This allows for inspection of variables, and step through the lines of code, which is a great learning technique.
# Running as a standalone Docker container
We also provide an example to run the application as a separate Docker container.
If you decide to run it as from the IDE, you may skip directly to the URLs section
There are multiple ways of achieve this.
We could run it as a JAR file, or maybe via the mvn spring-boot:run plugin.
We chose instead to run it as a WAR on Tomcat, and here is its Dockerfile:
FROM tomcat:latest
ENV spring.profiles.active=prod
ADD target/jwt-spring-boot-template.war /usr/local/tomcat/webapps/
EXPOSE 8080
CMD ["catalina.sh", "run"]
Note that the spring.profiles.active environment variable is set to prod
This makes Spring Boot load application-prod.properties:
spring.datasource.url= jdbc:mysql://db:3306/jwt_template
The jdbc url has been adjusted to db, which is also our database service name on docker-compose.yml:
# Use root/example as user/password credentials
version: '3.1'

services:
  adminer:
    image: adminer
    restart: always
    ports:
      - 8081:8080
    depends_on:
      - "db"
  app:
    build: .
    image: jwt-spring-boot-template-img
    ports:
      - 8082:8080
    depends_on:
      - "db"
  db:
    image: mysql:8.0.20
    command: --default-authentication-plugin=mysql_native_password
    restart: always
    ports:
      - 3306:3306
    environment:
      MYSQL_DATABASE: jwt_template
      MYSQL_ROOT_PASSWORD: jwt_template
Before running the container, we need to build the application WAR
> mvnw clean package

...

[INFO] Results:
[INFO]
[INFO] Tests run: 2, Failures: 0, Errors: 0, Skipped: 0
[INFO]
[INFO]
[INFO] --- maven-war-plugin:3.2.3:war (default-war) @ jwt ---
[INFO] Packaging webapp
[INFO] Assembling webapp [jwt] in [C:\pub\jwt-spring-boot-template\target\jwt-spring-boot-template]
[INFO] Processing war project
[INFO] Webapp assembled in [42044 msecs]
[INFO] Building war: C:\pub\jwt-spring-boot-template\target\jwt-spring-boot-template.war
[INFO]
[INFO] --- spring-boot-maven-plugin:2.3.0.RELEASE:repackage (repackage) @ jwt ---
[INFO] Replacing main artifact with repackaged archive
[INFO] ------------------------------------------------------------------------
[INFO] BUILD SUCCESS
[INFO] ------------------------------------------------------------------------
[INFO] Total time:  01:05 min
[INFO] Finished at: 2020-07-04T21:58:58-03:00
[INFO] ------------------------------------------------------------------------
We need database services up and running to get all tests to properly run.
Now that the WAR is in place, we need to build the image and start the container:
docker-compose up --build app

...

Step 1/5 : FROM tomcat:latest
 ---> 2eb5a120304e
Step 2/5 : ENV spring.profiles.active=prod
 ---> Using cache
 ---> d61399f7e4c5
Step 3/5 : ADD target/jwt-spring-boot-template.war /usr/local/tomcat/webapps/
 ---> 93ab1ba175eb
Step 4/5 : EXPOSE 8080
 ---> Running in 74700d2fed48
Removing intermediate container 74700d2fed48
 ---> 58a269e9f08a
Step 5/5 : CMD ["catalina.sh", "run"]
 ---> Running in d2665ea69221
Removing intermediate container d2665ea69221
 ---> 56c32281496d
Successfully built 56c32281496d
Successfully tagged jwt-spring-boot-template-img:latest
jwt-spring-boot-template_db_1 is up-to-date
Creating jwt-spring-boot-template_app_1 ... done
Attaching to jwt-spring-boot-template_app_1

...

app_1      | 2020-07-05 01:02:57.287  INFO 1 --- [           main] DeferredRepositoryInitializationListener : Spring Data repositories initialized!
app_1      | 2020-07-05 01:02:57.288  INFO 1 --- [           main] b.poa.marcosilva.jwt.ServletInitializer  : Started ServletInitializer in 0.794 seconds (JVM running for 14.917)
app_1      | 05-Jul-2020 01:02:57.343 INFO [main] org.apache.catalina.startup.HostConfig.deployWAR Deployment of web application archive [/usr/local/tomcat/webapps/jwt-spring-boot-template.war] has finished in [12,916] ms
app_1      | 05-Jul-2020 01:02:57.349 INFO [main] org.apache.coyote.AbstractProtocol.start Starting ProtocolHandler ["http-nio-8080"]
app_1      | 05-Jul-2020 01:02:57.371 INFO [main] org.apache.catalina.startup.Catalina.start Server startup in [13,131] milliseconds
You're ready to go when you see the Catalina Server startup message.
# URLs
These are the URLs and listening ports for services
| service | base url:port | obs |
|---|---|---|
| app | localhost:8082 | either from IDE or .\mvnw spring:run |
| app | localhost:8082/spring-boot-template | as a standalone Docker container |
| Adminer | localhost:8081 | after docker-compose |
| mysql | localhost:3306 | after docker-compose |
| vuepress | localhost:8083 | after yarn docs:dev |
# Dockerized mySQL
A common approach in Spring Boot is to use H2 (in-memory or disk-based) persistence for development. That's just fine for prototyping and very small-scale projects.
But as an exercise, we decided to use a dockerized mySQL service instead.
# Data initialization with Spring JPA
The data model in this project is quite simple, but still there are a few points that need attention.
Spring Boot data initialization runs resources/data.sql.
Here's an excerpt from resources/application.properties
spring.datasource.url= jdbc:mysql://localhost:3306/jwt_template
spring.datasource.username= root
spring.datasource.password= jwt_template

server.port=8082

spring.jpa.properties.hibernate.dialect= org.hibernate.dialect.MySQL5Dialect

spring.datasource.initialization-mode=always
spring.jpa.hibernate.ddl-auto= create-drop
As indicated by the highlights, data and schema will be refreshed after each restart.
This is fine for an example, but might not be appropriate for most use cases.
Though not used in the project, Spring Boot's @Sql annotation might come in handy while developing tests, as described here.
# JWT
From the IETF definition
JSON Web Token (JWT) is a compact, URL-safe means of representing claims to be transferred between two parties.
In-depth information on Spring Security can be found here.
# Testing with RESTer
Using RESTer Chrome plugin for testing the API.
Don't forget to:
- set the Content-type to application-json on header
- change the proper url if you're using Docker instead of the IDE to deploy the app
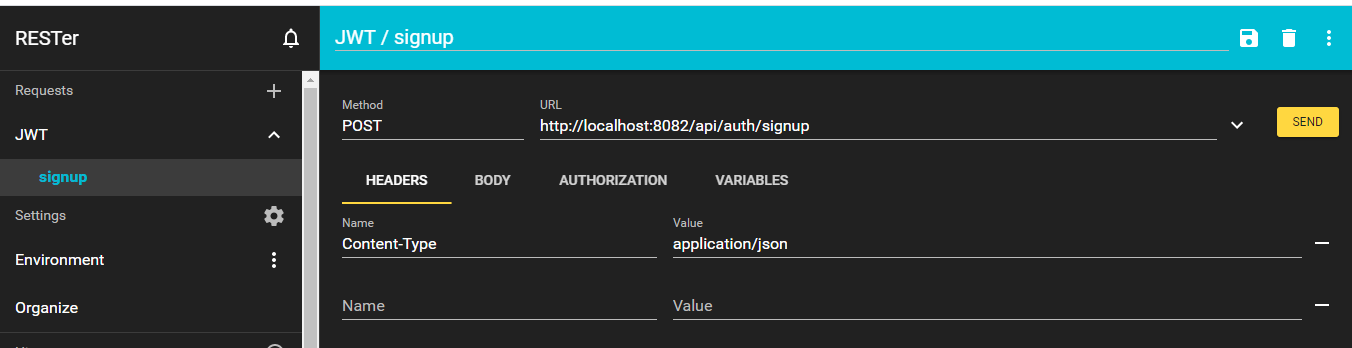
# signup method
| url | method |
|---|---|
| http://localhost:8082/api/auth/signup | POST |
payload
{
    "username":"mod",
    "email":"mod@marcosilva.poa.br",
    "password":"123456789",
    "role":["mod","user"]
}
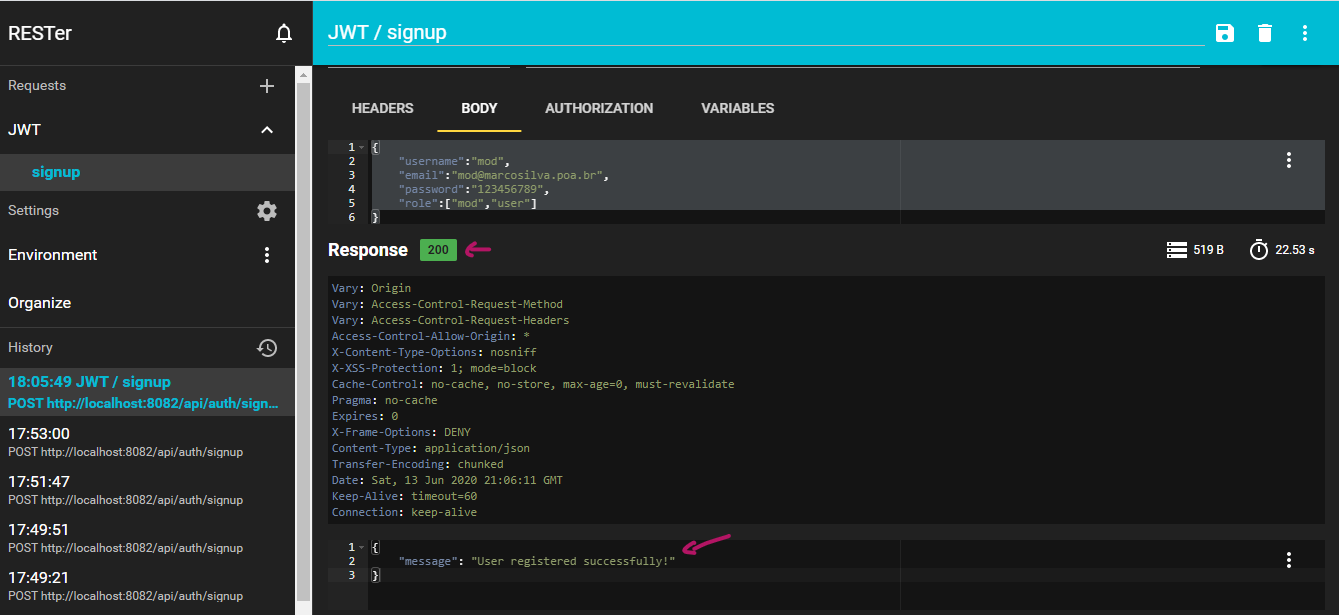
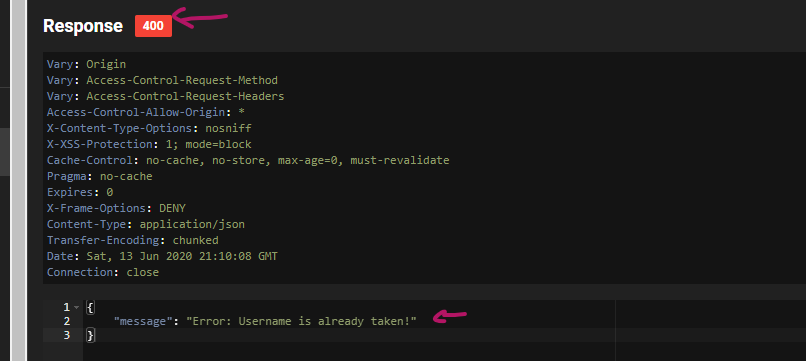
Because we use Spring Boot's create-drop data strategy, the signup method can be called once per username/password combination.
Of course, if you restart the app, the same combination can be used again.
You can check that after the first call on the same session, the method will fail.
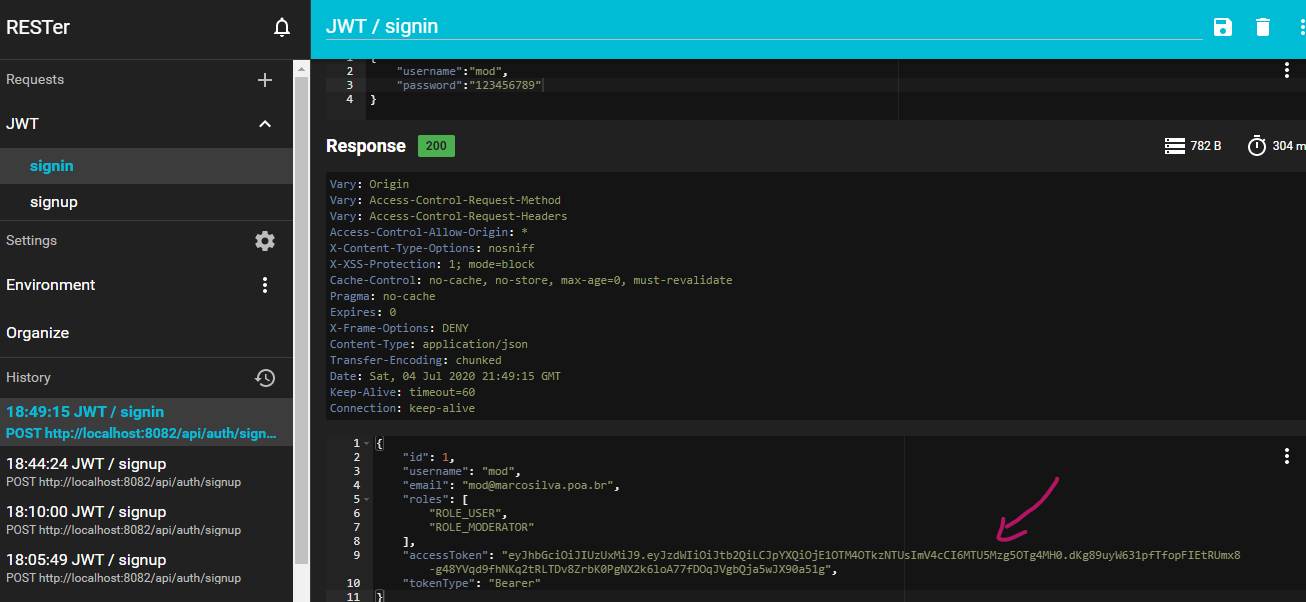
# signin method
After the sign up, we can retrieve our JWT token.
| url | method |
|---|---|
| http://localhost:8082/api/auth/signin | POST |
payload
{
    "username":"mod",
    "password":"123456789"
}
The response will provide you with the accessToken in its JSON body:
# About Vuepress
Before leaving, we'd like to mention Vuepress, which is a nice static site generator, specifically aimed at documentation of technical projects.
Static sites are great for CDNs, such as netlify or GitHub Pages
Help for Vuepress configuration options can be found here.
Markdown extensions are described here.
# Wrapping it up
That's it. Getting the token is basically how far we'll cover for now.
If you're interested in learning how to use the access token in a frontend app, please wait for the next article in this series.